Using Retime Editor for Video Editing in FCPX
Category - Learn More About Apple Final Cut Pro
Introduction to Retime Editor in Apple FCPX
In Final Cut Pro re-timing is used to speed up clip, slowing them down or even setting more than one speed in a single clip using Speed Ramp. It is a must to learn option for all video editors working on Apple FCPX. Even we cover it in detail in ours Apple FCPX course. In this blog, we will go through the process of using Retime editor for video editing in FCPX. Let’s start.
Please note: We can’t do changes in images and titles using it.
Table of Content
- How to Use Retime Editor in Apple FCPX
- How to proceed further with Retime Editor
- Speed Ramping in Final Cut Pro
- Steps to follow to use Speed Ramp for beginners
- Instant Replay in FCPX
- Steps to follow to use Instant Reply in Final Cut ProX
- Rewind option in Final Cut Pro
- Jump Cut at Markers in Apple FCPX
- Steps to Follow for using Jump Cut
- Learn Retime Editing Practically with our Production Institute in Delhi
How to Use Retime Editor in Apple FCPX
Using Retime Editor is an easy part while doing video editing in FCPX. We can understand it in a few simple steps given below.

Following are the steps:
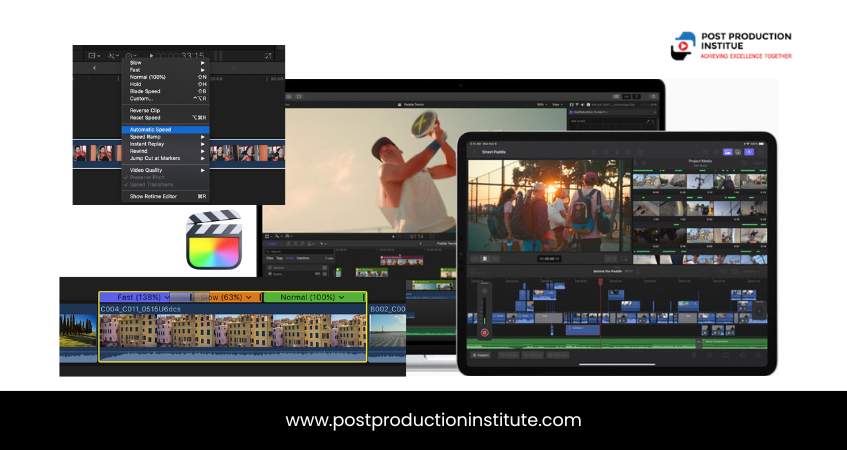
Step 1: Select the clip you want to speed up in your timeline and open the retime drop down menu at the bottom of viewer.
Step 2: Select a speed of your choice.
Step 3: We can change speed slow, fast or normal anytime by clicking an arrow. Or you can press command + R and select one of the presets. Dragg the re-time handle at the end of the clip.
We have one more option that is custom. With the help of custom speed we can forward or reverse the clip by setting up speed rate and even duration.

Note: If we want to slow motion effect then our clip should have higher frame rates. If it is in case you are unable to fix the speed rate then provide automatic speed option.

How to proceed further with Retime Editor:
- First select the clip
- From the re-time dropdown menu and select Automatic Speed.
- Then Final cut pro adjusts the speed of the clip on its own.
A 60 frames per second clip in a 24 frames per second timeline can be solved all the way down to 40% without having to duplicate any frames.
We can also slowdown manually by doing Maths like if we shoot clip at 120 frames per second so we can calculate 24/120 x100= 20.
We can slow it down to 20% through the custom option.
Speed Ramping in Final Cut Pro
Speed ramping is used to set single clip at different speed.

Steps to follow to use Speed Ramp for beginners:
- Place your playhead on the frame from where you want to set different speed now select your clip.
- Clip on retime menu and select blade speed now your clip split into two speed parts.
- Shortcut cut key of blade speed is Shift +B
- Now zoom in your timeline and change the speed of middle segment to 20% we can drag the ends of this transitions to adjust the timings.
This speed ramps makes our video look Amazing!
Instant Replay in FCPX
We use this option when we want to highlight specific action like tremendous shot in any sports or any dance move. Mostly we can see this type of replays in competitions or live matches where it is necessary to highlight some moves or shot.
When we select Instant Replay the title automatically applied. Now we can edit or remove title as per our choice.
If we talk about the speed of replay clip so by default it is applied in slow motion. You can adjust as per your editing needs.
Steps to follow to use Instant Reply in Final Cut ProX:
- Select the clip part you want for replay.
- Now from the retime editor select Instant replay.
- And you are done, here you got your replay shot.
Rewind option in Final Cut Pro
This option can be used with the exciting part of clip. But in this option title will not come with selection. One thing that makes it different from Instant Replay is that when we select the footage and apply the retiming rewind then the portion of shot will rewind with normal speed. You can adjust speed left section high and right section slow down to make it smooth.
Jump Cut at Markers in Apple FCPX
We mostly use Jump Cut at Markers option with the driving clips or people walking, clouds running and so on. When video is captured in one object for a long time and we don’t want to speed up and slow down our video then we can jump the frames without cutting the footage.
This automatically makes the footage shorter with ignorable jerks.
Steps to Follow for using Jump Cut:
- Select the clip
- Give it marking and now select Jump cut at markers from the Retime Editor.
- Now select the frames whichever you want. Let’s suppose we choose now 3 frames. So, the clip skipped from the 3 frames from the every markers.
Learn Retime Editing Practically with our Production Institute in Delhi
Our institute has programs covering training in Premiere Pro, After Effects along with Final Cut Studio. We also offer specialized certificate and diploma courses in video editing, post production, and animation.
Conclusion
So, we have see that Retime editor is really the best and wonderful editing option in Apple FCPX. It transforms video in amazing way gives smooth or swift transition without any use of effects and transitions. Many options are there like slow, fast, hold, blade speed, custom, reverse clip, reset speed, automatic speed, speed ramp, Instant replay, rewind, and jump cut at markers. These are really amazing to use and you must learn all. To start learning with experts at our institute, request for a free trail class today. Contact us at +91-8826 606 959