Use of Lumetri Color Panel in Premiere Pro CC for Better Video Editing
Category - Blogs on Adobe Premier Pro
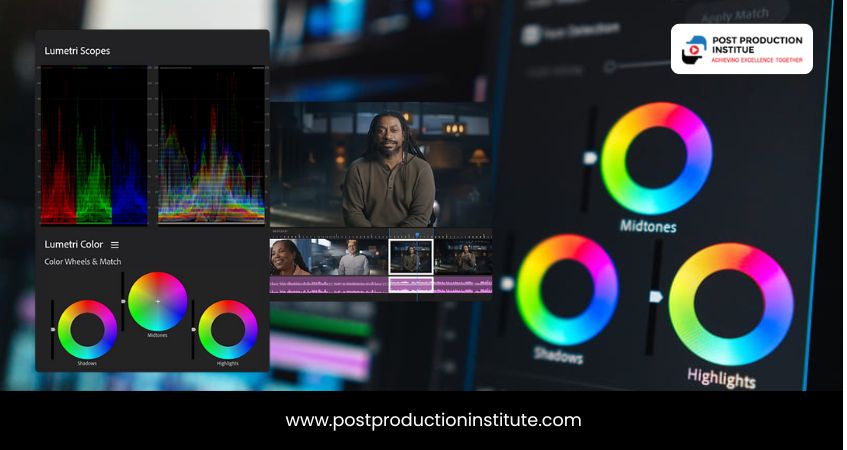
Introduction to Lumetri Color Panel
Videos and their editing using any video editing tool like Adobe Premiere are charmless without the Lumetri Color Panel. This panel is very useful in color grading and color correction of a video for video editors.
Those who are new to video editing must start by learning Adobe Premiere Pro first. This will create a strong foundation for them.
Table of Content
- Using Lumetri Color Panel in Adobe Premiere Pro
- Setting up Lumetri Color Panel in Adobe Premiere Pro CC
- Lumetri panel works for color corrections
- The Lumetri Color Panel is a Remote Control
- The Basic Correction Section
Using Lumetri Color Panel in Adobe Premiere Pro
To open the Lumetri Color panel, open your project in Premiere Pro and select a color in the workspace toolbar. You choose from a range of predefined settings or you can adjust the levels manually. Save your preferences to use on other shots in your video.
The Lumetri Color panel is the shading reviewing point of interaction worked within Premiere Pro.
Utilizing the Lumetri Color panel, you can move toward shading changes in a huge number of ways without leaving your present venture.
It is critical to apply shading revision inside the requirements of the DoD morals strategies.
Make your basics clear with a professional set of video editing courses to do the professional level of color grading using Lumetri Color options.
Setting up Lumetri Color Panel in Adobe Premiere Pro CC
The Colorwork area of Adobe Premiere Pro CC incorporates the Lumetri Color panel by default. You access the work area by picking a color in the work area switcher bar. The Lumetri Color panel is coordinated in areas.
Lumetri panel works for color corrections
How about we start with an outline of the Lumetri Color Panel itself? Assuming you've been doing your color corrections with Lumetri for some time and skill the controls work. You should jump straightforwardly to a portion of different segments, connected previously.
The Lumetri Color Panel is a Remote Control
Think about the Lumetri Color panel as a controller for the Lumetri Color impact. Anything you change in the panel influences the related settings in the Lumetri Color impact.
You could make precisely the same changes in the Effect Controls panel. However, the shading rectification controls in the Lumetri Color panel are a lot more straightforward to change. They're generally accessible in a similar spot.

The Lumetri Color panel (and the actual impact in the Effect Controls panel) is separated into six principle areas to some degree covering usefulness.
Thus, for anything picture-handling or video-altering programming you're coming from, you should be open to chipping away at your color adjustment in Premiere utilizing no less than one of these segments. We'll check out everyone.

Lumetri used to be a gigantic asset hoard and determined every one of the areas regardless of whether you hadn't changed anything in them.
The Basic Correction Section
This first part of the panel depends on the identical (basically for still picture takers) panel in Lightroom and Adobe Camera RAW, so it's not difficult to begin. This is the place where a great many people work when they do their shading revision and reviewing.
The greater part of the sliders are essentially clear as crystal, yet a couple are worth explicitly tending to.

Input LUT: This is the place where you add your specialized LUT to get your recording into the Rec. 709 shading space (more on specialized LUTs underneath). You can add an Input LUT before you begin changing the controls just after your recording is logged or start using the custom settings of the camera. This will make the tones in your picture look "typical", and the sliders will fill in true to form.
Note: Input LUTs that are applied here are handled before every one of the sliders and different controls.
The HDR White slider isn't dynamic until you pick High Dynamic Range in the panel menu.
The eyedropper or White Balance Selector can assist with fixing the white equilibrium in a clasp.
Click it and afterward pick a region in the image that should be white.
Ctrl/Cmd-snap to test the normal of 5×5 pixels, rather than simply clicking, which will test only one pixel.
This will provide you with a greatly improved portrayal of the shading, as there will forever be little varieties in the pixel esteems because of clamor and pressure curios that can impact your rectification choices.
The eyedropper will be a little bigger as you press Ctrl (Cmd) to demonstrate that it will test a bigger region.

I regularly experience difficulty tracking down a completely unbiased region in my recording, and I observe that I improve results when I change the sliders physically. On certain clasps, principally when you have a few clearly white regions, it will turn out great.

At different times, the White Balance Selector will change with the dark levels, presenting a shading cast in the shadows. As you've likely speculated at this point, I don't utilize the Auto White Balance Selector over and over again.
When physically tweaking the sliders for a white equilibrium, change the Temperature slider first until you get the red and blue levels something similar. Then, at that point, you can change the Tint slider until the green matches with the two others. There's a justification behind the request they have in the UI.
With the White Balance controls, you will track down the Tone sliders easily. They ought to be extremely straightforward. They control precisely what their names show. Until you pick High Dynamic Range in the panel menu, the HDR Specular slider will be turned grey out.

When changing the yellows to be more orange and more soaked.
The Lumetri Color panel is cool and very useful while editing a video in Premiere Pro. This feature makes this software more powerful. People love to watch such effects created by Lumetri color panels. Learn advanced editing, color grading, and motion graphics from experts at our post production institute. Check all the courses in editing and post production and start your career today!